Thursday, September 30, 2010

Matchbox 1/72 Stranraer

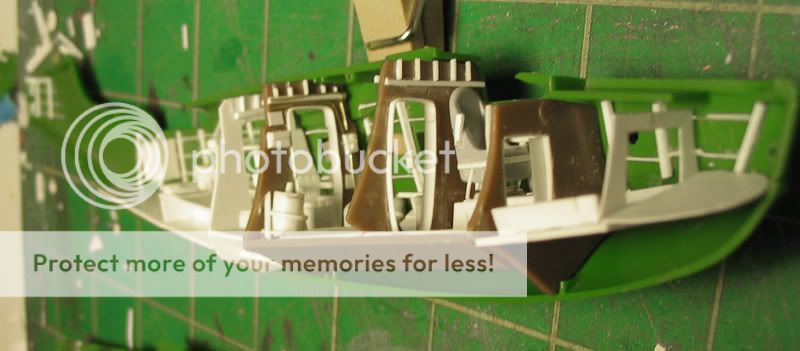
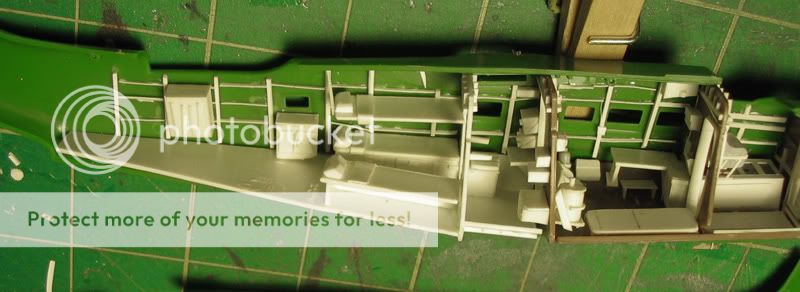
I won a Stranraer at my model building club's auction two weeks ago (US$3) and jumped right in. I wasn't planning on much of an interior, but that little open door just called to me. It is my first 1/72 scale model since 1989...

More specifically, it called to that little portion of my brain afflicted with AMS. I'm holding back a bit, not putting super-detail where it really won't be seen, but I wanted the interior aft of the door to at least look busy when the viewer's eye moves past the windows.

The admin of the forum on Seawings.co.uk was very helpful when I told him my tale when applying to the forum. He sent some awesome plans.

This is the rough, unpainted interior. Much of the little bits (Lewis magazines, first aid kits, extending lamp, etc) are not in and will be painted separately. The major furninshings are done. The cockpit is nearly done, I'm deciding on how to do the second pilots fold-away seat and rudder pedals. Click on the images for the full view. Most of the images are longer than 600px and blogger just crops them.


Sorry for the odd angle on these...


A lot of work for a tiny door. But, it had to be done. Well, maybe it didn't, but I did it anyway...


Listening to while posting: the torrential rain hitting the roof. Zowie!

Monday, August 30, 2010

Well, isn't this ironic

Or, maybe not. The definition of irony sometimes escapes me.

Here's the deal and the bad joke: I don't often post finished models. One might say, I'd post a finished model when pigs fly. So, here's a flying pig:


And my build of his aircraft, FineMolds' Savoia S.21 from Haiyo Miyazki's wonderful film Porco Rosso. (make sure to click to embiggen these)


The model is a marvel of engineering in most places, silliness in others. The silliest part is in the interior. Just ahead of the cockpit is the fuel tank, beautifully molded with nuts on the mounting flanges. The silliness is that when you finish the model, this part will not be seen except for a tiny glimpse of the rear of the tank under the instrument panel. There are no provisions, or even the possibility for opening a panel.

The other silly part is the engine. The engine was full of detail, including a manifold in the aft section and exterior detail to the engine gearbox. I had to try to show this magnificent little thing, especially when I went all AMS on it and put detail that would never be seen (and since I took no photos of the finished engine before buttoning it up...)

The engine cowling pieces were thick, so I asked a fellow Mount Mansfiled Modeler if he could vacuum form a replacement for me. He was gracious enough to do so (he and his wife also had me over for dinner and a great dessert, too. Both of which I was grateful for).

Looking to the film and finding a couple of shots of the engine under repair, I set to work. Here is a screenshot:


Here's my recreation of the panels:


Here are all the pieces ready for painting:


And here it is finished and assembled. Note how I also hollowed out the exhaust and the engine cowling vents. That was pretty touchy, but looks much better:


Here's a closeup of the cockpit, the harness are scratchbuilt as the kit only came with a decal harness:


The belly was my first attempt at oil wood grain. I've developed an easy technique for using Tamiya NATO Brown to make wood grain, but the large area and need for a more subtle effect prompted me to try oils (the fact that my wife is a painter made supplies easy to get). Try as I might, however, I could not take a decent photo to show off my wood grain. It looks good, but I should have kept at it until I got a more subtle Albatros DVa-style plywood effect. Also, the stripes are painted so that I could weather them as close to the main fuselage as possible. I think I'll paint all stripes from now on. easier in some respects to decals.


While this is not good enough to enter a contest, it is the best build I've done to date. I learned a lot and there are some nice moments on the plane. (though, looking at the photos, I need to re-tension the pontoon rigging. I'll get on that before the next modeling club meeting). I'd really like to build another and use this one to build an overly-ambitious diorama of Porco's lair:


Two more pics for good measure:


next in the pipeline: another Academy 1/48 P-26 Peashooter. I'm going to make this one shine (after I get some aftermarket decals to replace the very thick kit ones.

Listening to while posting: "Aeroplane" by Bjork (wow. Is THAT ironic?)

Saturday, May 22, 2010

t-6 Texan: Round Two!

To get over my frustration and low self esteem from the Siemens-Schuckert disaster, I decided to build another T-6 Texan. This is a good, solid kit and I really enjoyed building it last time. The first turned out pretty good and I would put the lessons I learned building it to the new one.

The lessons learned, basically, were procedural (I assembled or painted some things second that I should have done first) and detail (I put lots of detail in places that were not visible at all when assembled and didn't detail some places that were visible).

Right now, it's being painted, but here are some process shots.

First is the hollowed out exhaust. It needed it as the original was not very deep. First the basic drilling:


Behind the fuselage, you can see this little guy. It's a hollowed out black sprue.


That's needed to fill the hole, but also add depth. Here, it's glued onto the inside of the fuselage:


Of course, you can't tell the depth from this photo, but it's there.


I also decided to make the control surfaces in non-neutral positions. The ailerons proved impossible, but on all of the photos I checked, they were in the neutral position while the elevators drooped. I didn't have a JLC combo knife so I just used an Xacto. Slowly cutting over and over until the piece came free.


I also decided to put a bit more detail into the wheel wells. Here, I drilled some lightening holes that are in the actual aircraft. I've since added hydraulic lines and a small bulkhead on the airframe.


I also re-worked the rear bulkhead. It was very difficult to find a photo of this section. But, between a few photos of Texans being restored, I managed to get close

Here's a bad shot of the original (those lumps are ammo boxes. Only used on Texans used for bomber gunner training):


and here's the re-built:


I'm really moving slow on this one. Working on my seam filling and other basic stuff. I'd like to get this good enough to take to Valley Con next spring. We'll see. One of the guys in my model club is a very experienced modeler who was a judge at the Nationals this year, so he can pre-judge my work!

Monday, April 26, 2010

FAIL!

Well, the Seimens-Schuckert is a major fail. I did a big post at theHyperscale forums on their, oddly timely, "modeling disasters" section.

Everything you'll need to know about why I'm not posting a finished pic of the Seimens-Schuckert isright here.

I'm doing another T-6 Texan to make myself feel better...

Friday, February 26, 2010

too busy building to post

About Xmas time, The Mount Mansfield Modelers had their annual swap meet/sale. I saw what I thought was a little gem and asked the guy what he wanted for it. "Nothing", he replied. I asked him a couple of times to be sure and he was. He had too many to build and just wanted to get rid of it. Coolness!

Then I checked on eBay and found out that the kit, in shrinkwrap as this one was, went for $60 - $80! Now, I couldn't take that from him, so at the next meeting, I told him about eBay and what the kit was worth. He still told me to keep it. I told him I planned on putting this at the top of my list of builds. And I did.


Here she is, the Eduard Siemens-Schuckert D.III (kit circa 1993). This aircraft ("LO!") was flown by Germany's greatest ace after Richtofen: Ernst Udet.


Now, Eduard is now known as a company that creates some of the best cast, most detailed, best engineered model kits out there. It was not always the case. This was a short run kit and I'm not sure what they used as molds, but I think they may have been jello. Check out the flash on these pieces:


Here's a closeup of the prop blades:


and one of the guns:


Eduard is now also known for exceptionally detailed and meticulously researched photo-etched detail sets. To make up for the crappy molding and soft detail of the plastic, they included a massive photoetch set. The entire cockpit is photoetch and there are even gun cooling shrouds. However, cool this seemed at the start, the pe cockpit was to become the first bear of the project.


I spent a good three or four hours just sanding the pieces. Gods, there was a lot of flash. I also took the time to separate the control surfaces. It always makes a plane more natural-looking to have its control surfaces not in the neutral position.

Then to the cockpit. Bending and painting and assembling the cockpit was really hard. The pieces were filddly and fragile, but I managed to get it together. For scale, those lines to the left are 1" (2.5cm) apart.


I then moved on to assembling the fuselage (which, by the way, has no alignment pins). Then, due to handling, I broke the damned cockpit. Snapped those side arms clean of. Since the pieces were too small for CA glue and epoxy would be a pain, I decided to scratchbuild a copy out of sheet styrene. It was pretty easy as I had a three-dimensional blueprint handy:


Not bad. I have some shots of the fully completed cockpit, but I haven't dumped them from the camera yet.

And by the way, do you see those tiny buckles on those seatbelts? Those had to be slipped on the seatbelts individually. Jeezum!

Next up: Fuselage Follies!

Monday, October 19, 2009

The Eggs and Us

As promised, here are some shots of the other entries to the Mount Mansfield Modelers Egg-stravaganza.

They are presented in the order that they appeared on the table, from left to right (minus mine, btw). Keep in mind that base of these models were eggs that were identical except for color.

First was the pun (and I did groan out loud, but the creator expected it), I give you The Nest Egg:


This requires a bit of explanation. It represents the first solar-powered anti-gravity fighter-bomber in the post-war British inventory (the upper hull has to be transparent for the solar panels to work, see?)


Next came the WW1 entry. The rudder is movable, the wings are doped fabric, the canopy opens and closes and the prop is battery-powered. UPDATE: This beauty took second place


This yellow beauty was created by the guy who's idea this whole thing was (he also generously supplied the eggs. Check out those fabulous eyelashes around those cool windows and the tongue dashboard!


Finally was the Spruce Goose-Egg. Everything was scratchbuilt except or the engines and props. Look how smooth and perfect the boat hull is; it was made with from scratch with plastic cardstock. The outboard pontoons were carved from wood then molded on a vacuum-form machine.


listening to while posting: Sweet Enemy chilling out on the floor of my studio with the cat. She just got back from a long drive to Portsmouth and is telling me about all the art framing stuff she learned how to do.

Thursday, October 15, 2009

The Egg and I, Epilogue

Well, I just got back from the Mount Mansfield Modelers meeting and the egg contest was tonight. Man was I nervous! I hadn't felt that nervous since my last Aikido test. Sheesh. First I was worried that it would break in transit, or that I wouldn't be able to assemble it, or it would break on the display table.

Why was I worried about breaking? Earlier in the week, the nose gear fell off three times, each time I was certain it was on for good. However, it made it to the meeting and it stayed whole.

There were seven entries and competition was fierce! Fantastic, fantastic works. Of course I forgot to bring my camera, but I'll try to snag some from another member. The two standouts were a Spruce Goose Egg with the wings, tail and boat-hull nose all scratchbuilt and perfectly shaped and a "Jokker" (A WW1 nut, he couldn't decide whether to build a Junkers or a Fokker) It was a monoplane with movable rudder, full cockpit, doped-fabric-over-wood-frame wings and a battery powered propeller. On the line were two trophies built by the MMM's chairman (a gold and silver egg trophy for first and second place).

There were two rounds of judging; one for first place and one after for second place. I voted for the Jokker both times, but it was tough to decide!

As I said, I didn't get any shots at the show, so here are some shots I just took of the completed Snowflea on the dining room table.


So, how did the Snowflea fare against the other outstanding entries?